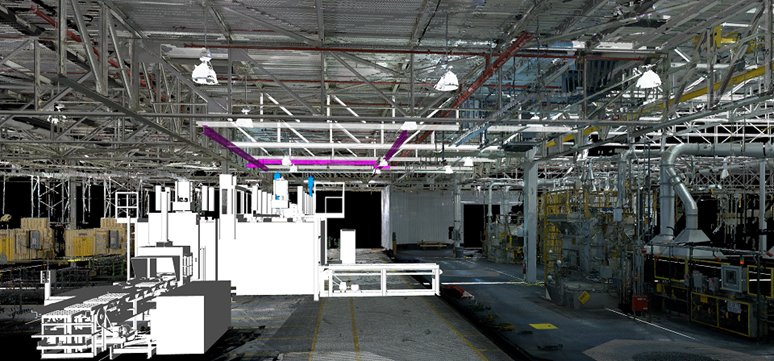
Achieve Efficiency in Manufacturing with High-Precision 3D Scanning Services
With precise measurement, analysis, and visualization capabilities, our scanning services enable enhanced efficiency and innovation throughout your manufacturing process. By integrating Manufacturing 3D scanning services with BIM to FM, you can benefit from real-time monitoring, preventive maintenance, optimized space utilization, and energy management.
3D Laser scanning coupled with three-dimensional digital twin modeling, provides a high return on investment and powerful solution for reducing construction and operational costs.
Why Choose PMC
We scan large scope areas. Manufacturing and Industrial Plants pose unique challenges when it comes to scanning. Expansive areas, often spanning hundreds of thousands or even millions of square feet, necessitate a distinct scanning approach. Having scanned hundreds of millions of square feet, PMC has the skills needed to provide quality results.
We work with your schedule. Many facilities operate around the clock and have limited downtime, causing the identification of suitable scanning windows to present a challenge. PMC works with each schedule to effectively accomplish tasks that require innovative problem-solving.

We support Rapid Change. As manufacturing and industrial plants embrace Industry 4.0 advancements, the rapid pace of change poses considerable challenges. PMC offers innovative solutions that enable scanning to be effectively conducted in dynamic and rapidly evolving environments.
Cost Effectiveness: PMC's laser scanning technology eliminates manual measurements and reduces site visits, saving time, travel expenses, and minimizing the risk of rework. Our cost-effective approach delivers accurate data capture and virtual inspections, leading to savings in materials, labor, and project delays.
Safety is our priority. We possess the expertise and caution needed for Manufacturing and Industrial Plants. Our team follows a comprehensive Safety Policy and undergo specialized training specifically tailored to the industrial setting.
Our Industry Experience Includes:
Automotive
Appliance Manufacturing
Building Materials
Chemical Plants
Food and Beverage
Manufacturing Equipment
Oil & Gas
Paper Mills
Pharmaceutical
Power Distribution
Steam Plants
Steel Mills
3D Scanning Benefits for Manufacturing


- Deliver cost-effective and timely results, meeting your project deadlines.
- Achieve an overall reduction in operational costs reduce project timelines.
- Ensure accurate measurements and documentation, minimizing errors and discrepancies.
- Facilitate better visualization, analysis, and understanding of the scanned environment, supporting informed decision-making.
- Reduce the need for humans to enter hazardous or dangerous environments.
- Enable the detailed documentation and preservation of historical sites, cultural heritage, and important assets.
- Promote better communication and collaboration among project stakeholders and provide a shared understanding and alignment of project goals.
3D Scanning Features for Manufacturing


- Capture detailed 360-degree color panoramic images for comprehensive documentation purposes.
- Advanced processing techniques to generate comprehensive deliverables.
- Rigorous quality control measures to ensure accuracy and reliability.
- Acquire detailed and precise laser scan point cloud data with survey-grade accuracy.
- Minimize costs associated with frequent site visits due to incomplete measurements.
- Streamline the scanning and conversion process for multiple areas with high efficiency.
- Alleviate workload overflow to ensure on-time delivery.
- Benefit from round-the-clock support and assistance.
- Effectively manage and organize data for improved efficiency and accessibility with streamlined documentation and archiving.
